 Just when I think I've got the some great new method or technique down in Photoshop, another one comes along. That seems to be life with a program that I never stop building on. As I've learned teaching Photoshop for more than 15 years, Photoshop is a powerful and confusing platform, where regardless of skill level, I can easily improve or destroy a photograph. I've seen people that only understand a few basic Photoshop tools turn their knowledge into art and a career. Working with hundreds of skilled Photoshop users I've taken note of how they have succeeded and struggled when editing, paying close attention to what tools, features, and techniques they use. I've come to the conclusion that the needed foundation of Photoshop consists of a balance of knowing Selecting, Layers, and Masking. This may sound simple or obvious, but most people miss some critical tricks in one of these areas in habitual editing.
Having a good balance of Selecting, Layers, and Masking allows me to easily take on the how-to's from any book or magazine. I love the Photoshop articles published in the many photo magazines, but when I run into a new recipe and I have to stop because of some new trick, I must take a closer look at what I really know in order to have long-term success in Photoshop.
In this three-part article, I will dig into Selecting, Layers, and Masking giving simple tips that should be considered in every-day editing. Regardless of how simple or complex my methods are, I always try to approach Photoshop with a focus on loss-less editing and keeping the file size manageable.
Selecting means simply to choose or pick out. In Photoshop this is just is the first step to making an alteration to the selected area. Unfortunately, selecting the finer details of a photograph can be very challenging. Thankfully, Photoshop has many tools to simplify, or confuse us more on making quality selections. Yes, most of us are able to grasp the Marquee, Lasso, and Tragic Wand selection tools, but what are those overlooked features that can improve and simplify our selecting?
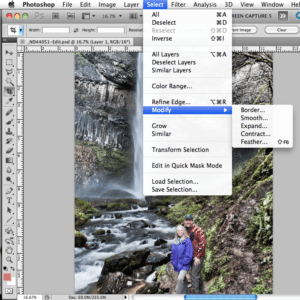
One commonly overlooked menu is the Select pull down menu. This is a goldmine of selection, tweeks, and adjustments. Here you will find simple options to expand and contract based on the number of pixels you specify (perfect for eliminating haloed edges). Grow is another method for expanding your selection, it includes all adjacent pixels falling within the tolerance range specified in the Magic Wand options.
Whenever I make a complex selection that I don't want to ever repeat, I always use the Save Selection option under the Select menu. This selection then saves as an Alpha Channel, which can be viewed or modified under the Channel panel/pallet. To simply bring back the saved selection, click on the Select menu and choose Load Selection.
One of the most important times to select is just before you add an Adjustment Layer or Layer Mask. Any selection you make will be applied to the mask. This may sound simple because it is, but it's a commonly overlooked editing method.
A few more simple things you can do to improve any selection:
– Inverse – Cmd/Ctrl + I (Mac/Win) Sometimes its just easier to select the opposite of what you want and then inverse the selection.
– Refine Edge – Dramatically improved in CS5, this should be top of your list for improving the edge of you selections.
– New Layer Via Copy (aka Cmd/Ctrl + J) This will place any selection into a new layer.
– Transform your selection (similar to Free Transform) by going to the Select menu and choosing Transform Selection. A great selection modification!!
This is only the beginning! With many more selecting tips out there to learn, I want to push these and more selection methods into your editing with Layers and Masking. My upcoming posts with dig further on how to build your foundation for Photoshop.

