Post by TWiP Contributor: Alex Singh
Sit back, relax and grab a cup of hot chocolate. It's time for a physics lesson! For those of you still reading don't worry. It's not that bad. To understand photography is to understand light. And sometimes that means cracking open a physics book. Lucky for everyone, greater minds than mine have done the hard work. I'm just here to illuminate you on the matter.
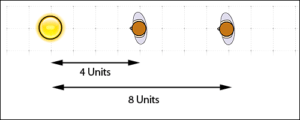
An Inverse-Square Law in physics states that a ‘specified quantity or strength is inversely proportional to the square of the distance from the source of the physical quantity.' In regards to light, the inverse-square law states that the ‘intensity of the light … is inversely proportional to the square of the distance from the source.' Simple, no? OK, let's put this in plain English. Simply put, if you move an object X times away from the light source it will receive 1/X2 (inverse square) the amount of intensity of light. Move an object twice the distance from the light source and it will receive a quarter of the intensity of the light, for example; move the object three times the distance and it will receive 1/9th the intensity.
You will often hear this difference in intensity referred to as ‘falloff' in photographic circles and understanding it can prevent lots of headaches and provide another tool in your arsenal. A helpful rule of thumb is in order to halve the illumination of the subject increase the distance from the light source by a factor 1.7 and in order to double the illumination, decrease the distance by a factor of 0.7.
By moving the subject twice the distance from the light source, it receives a quarter of the intensity of light.
As flashes and strobes have become more sophisticated, lighting the above scenario becomes almost trivial. It's also intuitive. As the distance between the subject and light source increases, the illumination on the subject decreases. Now you just know by how much. But things get a little more complicated when we add another subject.
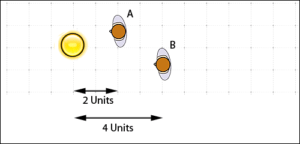
Subject B receives approximately a quarter of the light at subject A does.
Looking at the above scenario, we can see that subject B is illuminated about a quarter that of subject A. For some occasions this will be the intended result and you can call it day, but what if you wanted both subjects illuminated equally? The most obvious and probably best approach would be to add another light source to further illuminate subject B. There are other approaches, however.
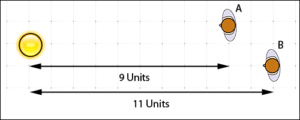
Subject B used to be twice as far from the light as subject A. Now it is a lot closer, relative to subject A. It receives approximately 0.7 times the amount of light that subject A does.The falloff is greatly reduced.
Notice that by moving the light source away from both subjects the relative difference in distance of both subjects from the light source is decreased and, by virtue of the inverse-square law, the difference in illumination is decreased. This brings up an important facet of the inverse square law: it's all relative. If you can decrease the relative distance from the light source between multiple subjects, you will decrease the falloff. If you move the the light source very far away, the falloff will be minuscule or even imperceptible. At about 93 million miles away, the sun is a great example of a far away light source where even with a difference of a few miles between subjects the falloff is imperceptible.
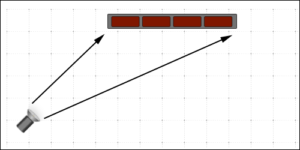
The left side of the wall is much closer to the light source than the right side. The falloff will be very noticeable.
By moving the light source back, the distances to the light source are much closer together than before. The falloff is reduced.
Falloff is easily seen when there are multiple subjects, but as you can see in the above diagrams it also applies to single subjects. If the light source is close enough, there will be noticeable falloff across a subject. By moving the light source back, the relative difference in distances across the surface of the subject to the sight source become diminished and so does the falloff. There is a trade-off. The overall light illumination will be decreased because the light source is further away. You will have to compensate by increasing the strength of the light source or increasing the exposure.
The light source was only a few inches away from the guitar. Notice the change in illumination across the guitar.
The light source was moved about 3 feet back. Notice how the guitar is more evenly lit.
Above is a real life example of what falloff looks like. In the first photo, the light source is very close to the guitar and the difference in illumination across the surface is very noticeable. The right side is very bright and quickly gets dark. The second photo shows the same subject with the light source moved back and turned up to account for the overall loss of illumination. As you can clearly see, the guitar is more evenly lit. It does gradually get darker towards the left side but never gets as dark as the darkest spots in the first example. Neither example is better than the other. In fact, even lighting is sometimes referred to as boring lighting. Falloff can create a great sense of drama. But even lighting should not be dismissed altogether, especially if you want to show detail throughout the subject. As with most things in photography, there is no right or wrong, just choice. Understanding the inverse-square law just gives you another choice to make the photograph that you want.
Credits
[box]
Alex Singh
http://www.alexsinghphoto.com/
[/box]


