Foundational Photoshop, Part 3 – Layer Masks
I remember one specific class I was giving years ago where I sat down with two students, one new to Photoshop, and the other with a fair amount of experience. I showed them some quick basics on Layer Masks and masking Adjustment Layers.
About one minute into my demonstration they both stopped me and said, “WAIT!…I don't have use the Eraser tool?” This was a common comment, but this is when I started taking a look at all my students, regardless of Photoshop knowledge, and how many of them used Layer Masks in their day-to-day editing. Where selecting, Layers, and Layer Masks become critical in our long-term success in using Photoshop, Layer Masks seem to be the one feature that gets the most overlooked.

The basic function of a Layer Mask is simple. It's the ability to reveal and conceal pixels between layers. Like wearing a Halloween mask, the face is covered, but the eyes show through. Think of the face as the bottom layer, and the Halloween mask as the top layer.
All of this sounds simple, but like many things in Photoshop, there are multiple ways to achieve your goals. The first thing to remember about Layer Masks, there isn't some cool tool that looks like a role of masking tape that simply applies a mask.
Layer Masks are based on applying black or white to the mask using any tool/function in Photoshop that can apply black or white, like the paintbrush tool, gradient tool, or the fill command. To add to the flexibility of applying a mask, I can apply any shade of gray to lower the opacity of the mask. This is easy with the gradient tool or just lowering the opacity of the Paintbrush tool.
Where do Layer Masks give greater flexibility over erasing pixels? If I'm using the Paintbrush tool to apply/adjust a mask and I conceal too much while painting black, I can switch my foreground color to white and paint back the pixels to reveal them.
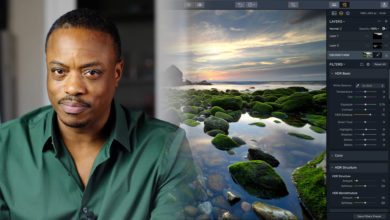
When it comes to when to using a mask, selective editing is where it starts. For example, when I want to brighten only the sky in a particular photo? I select the sky in the photo then add a Levels or Curves Adjustment Layer and make the necessary adjustments. The selection I made will automatically be applied to the mask and only the selected are will see the brightened adjustment.
One great touchup to many portraits is to sharpen only the eyes of the photo. This can quickly be done by duplicating your layer, then apply a filter effect like Smart Sharpen to the new layer. This will sharpen the entire photo, now to apply the mask so only the eyes are affected. Select the eyes, I recommend a feathered edge brush; now click on the “Add Layer Mask” button at the bottom of the Layer Panel. Now only the eyes are sharpened.
My favorite way to Dodge and Burn is to use a Levels Adjustment Layer and it's mask. To Burn (darken) I simply apply a Levels Adjustment Layer and adjust the image to be too dark. Now fill or paint the mask with solid black so the darkened effect of the Adjustment Layer doesn't reveal itself.
With the foreground set to white, choose the Paintbrush tool and lower the brush's opacity to 25%. Now paint in the areas you want to darken. To Dodge (lighten), use these same steps on another layer, only lighten the adjustment of the Levels.
Here are a few quick tips simplify your Layer Masks:
- Masking is based on the colors Black & White. Remember, “White reveals the masked layer, Black conceals the masked layer.
- Make a selection of the area you want masked first, then add your Adjustment Layer or Layer Mask. The selection will be applied to the mask.
- Control (Win)/Command (Mac) + I will invert your mask.
- Adjustment Layers will have a mask by default when adding.
- Changing and applying your mask color to any shade of gray will lower the opacity of your mask.
- Always be sure your mask is the selected thumbnail on the appropriate layer before you make any changes to the mask.
- For layers that don't have a Layer Mask, the “Add Layer Mask” button is located at the bottom of the Layer Panel. It's the gray box with the white dot in it.
- When on a mask, the foreground/background colors are fixed to black, white, or gray.
- Whatever your foreground color is set to, that's to color the will be applied to your mask.
- The keyboard shortcut “x” will swap your foreground color with your background color.
Remember, Layer Masks go hand-in-hand with using layers and selective editing. Take the time to add Layer Masks to your use of Selecting and Layers and you will find your editing time decreasing with the quality of your edit always improving.